Course Registration
Instructions for course registration on Sisu.
Before you register for a specific course unit, you need to have an active study plan. See instructions for creating a study plan here in case you do not yet have a study plan on Sisu. To be able to register for a course you also need to have the it activated in your study plan.
Please note that selecting a course unit in your study plan is not the same as registering for a course.
Registration through the timeline
This method suits you who have followed the ordinary study plan and those of you who are in your first or second year. This method shows you clearly what course units you must complete next, i.e. it is easier for you to register when you know what course units you must complete next.
Please note that you first need to apply a timing template on your timeline before you can register to teaching through the timeline.
- Select the tab Timeline, and you will see your study plan in a calendar view. This view is practical for you to overview the order in which you can take your courses.
- Go to the blue tab on the left hand side titled Timing template and click to select.
- A pop-up window with a drop-down menu appears. Here, in the drop-down menu, you need to choose the year when you started your studies. Then press the Select button and close the grey pop-up window.
- Your courses are now visible in the calendar view. Go ahead and sign up for courses in each of the periods in the upcoming term. Proceed to selecting an individual course by clicking on the course code shown in blue.
- In the pop-up window that appears you need to select the academic year when you want to take the course. Verify that you have the correct completion method in the light blue tab, and then click on the blue tab that says Select . Then close the white pop-up window.
- Carry out the same steps for the courses that you are taking in the upcoming term in each of the periods. First select the course code in blue text, then select the academic year in which you will be taking the course in the drop down menu, select the completion method by pressing on the blue box titled Select, and finally close the pop-up window.
- When you have followed these steps for each of your courses you want to sign up for, select the tab that says Registration in the grey bar on the top of the page.
- On the left-hand side you will now see all the courses that you have added to your list. Here you need to select the blue tab tiled Register for each course you want to sign up for.
- In the registration pop-up window make sure in the drop-down menu here that you have selected the correct study right. (If you have additional study rights, you will see them all listed here, but most students only have one.)
- Finalize by clicking on the blue button titled Confirm.
- After you have followed these steps for each of your courses, you are signed up.
Registration through your study plan
This method suits students who already have an individual study plan or who only have a few study units left to complete, i.e. students in year 3-4 and Master students. This method is faster but you need to know exactly what courses are offered in the next period and you need to know what study units to register to.
Please note that you, to be able to register for courses, need to have the selected course added to your study plan.
- Start by selecting the tab Structure of studies.
- In the study structure view, look for the courses you want to sign up for, and select the course by clicking on the course code shown in blue. Verify this is the course you want to sign up for and also that the correct version is selected in the drop-down menu.
- Go to the tab Completion methods and click on the blue tab titled Select.
- Now, the course is listed for you. However, if you know you are going to sign up for another course as well, do not yet proceed to registration.
- Instead, click on the x to close the white pop-up window. Next, look for the other course/courses you want to sign up for. When you find the course select the course by clicking on the course code in blue. Again, verify that the correct version is selected. Next, select the tab Completion methods, after this click on the blue tab titled Select.
- Close the pop-up window, and as a next step, to register for the courses, select the tab for Registration in the grey bar on the top of the page. When you open the tab you will see here listed the courses you have selected. Next, register to the courses by clicking here where it says register.
- Make sure you have the correct study right listed for the course in the drop-down menu here. Most students have one study right only. However, if you have more than one study right, all of your study rights will be listed in this drop-down menu.
- As a last step click on Confirm.
- Follow the same steps for the other course. Remember to check that the correct study right is selected, and click on Confirm.
- At this stage you have signed up for both courses.
Change the course unit to another version
In general, students who started their studies in 2024 or earlier, should have the 2024-2025 version of the course units activated in their study plan. There might be exceptions, where the version needs to be updated to 2025-2029.
Step 1
- Click on Structure of studies in the upper left corner.
- Look up the course unit in the study plan.
- Click on the blue course unit code.
Step 2
- Here you see that the version in your study plan is 2024-2025 but when you check the Completion methods, you can see that there is no upcoming teaching.
Step 3
- Click on the drop-down menu and choose the version 2025–2029.
- Click on Switch to this version. To be able to select a completion method this window needs to be refreshed, so you will have to close it and open it again. Click on the blue course code, and then Completion methods again.
Step 4
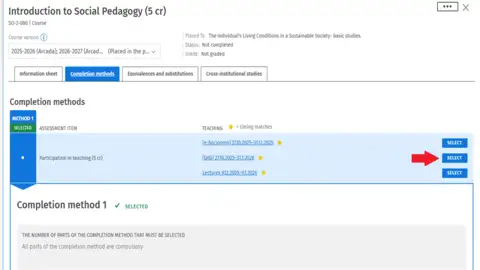
- In the field Teaching you see when there is upcoming teaching scheduled for this course unit.
- In some cases, there can be several implementations to choose from. Please make sure that you choose the one that is meant for your degree programme/field of study.
- Click Select.
- Close the pop-up window.
Step 5
- A blue banner will appear when you have selected an implementation.
- Click on the blue banner that takes you to the Registration page.
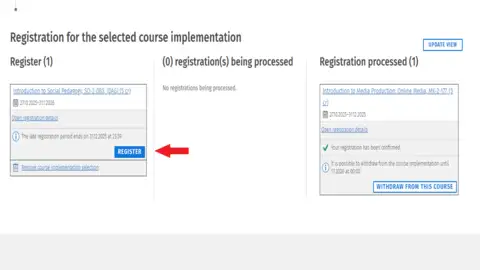
- Scroll down until you see the headline Registration for the selected course unit.
- Click on Register in the implementation.
Step 6
- Check that you have to right study right in the drop-down menu.
- Click on Confirm to complete the registration.
Replace a course unit with a new equivalent course unit
Students who started their studies in 2024 or earlier might notice that there are course units in the study plan that don’t have a completion method. In this case the course unit must be replaced with the new equivalent course unit. In general, this is not the case but there are some exceptions that your study counsellor informs you about.
Step 1
- Click on Structure of studies in the left upper corner.
- Click on the little blue course unit code. The text No completion methods to select under the course unit name indicates that the course unit must be replaced.
Step 2
- Here you see what version of the course unit is placed in your study plan. By clicking on Completion method, you will notice that there are no completion methods available.
- Click on Equivalences and substitutions.
Step 3
- Select the course unit that you need to place in your study plan. If there are several options and you don’t know which one to select, contact your study counsellor.
- Exit the pop-up window by clicking on the x in the upper right corner.
Step 4
Now you see two small arrows in the course unit that has been replaced with the new equivalent course unit.
Step 5
- If you see that the new equivalent course unit says Select completion method you must select the completion method to be able to register to the implementation. If the course unit does not have this text, go to step 9.
- Click on the text Select completion method.
Step 6
- In the pop-up window, select Completion method 1, Participation in teaching or Completion method 2, Validation.
- Click on Confirm.
Step 7
- Click on the blue course unit code.
Step 8
- Click on the tab Completion methods.
- Now you see that the column Method 2 is activated, it is dark blue and has one assessment item called validation. Under teaching you see the time for the implementation. Click on Select.
- Close the pop-up window by clicking on the cross in the upper right corner.
Step 9
- Please note that you are still not registered to the implementation and to complete the registration go to the tab Registration on the top of the page.
- Scroll down until you see the heading Registration for the selected course unit. Here you see the implementation for validation.
- Click on Register.
Step 10
- Check that you have the right study right in the drop-down menu.
- Scroll down and click on Confirm.
- Now you see the implementation under the heading Registrations processed.
Select completion method
Some course units have several completion methods and to be able to register for the implementation (teaching) you must select one.
If you have studied before or have work experience that you want to validate, you are to register to the implementation for validation. To register to the right implementation you need to select the completion method validation for the course unit in your study plan.
You see in the study plan what course units have several completion methods, next to the course unit it says Select completion methods.
Step 1
- Click on Structure of studies in the upper left corner.
- Look up the course unit in the study plan.
- Click on Select completion method.
Step 2
- In the pop-up window, select Completion method 1, Participation in teaching or Completion method 2, Validation.
- Click on Confirm.
Step 3
- Click on the blue course unit code.
Step 4
- Click on the tab Completion methods.
- Now you see that the column Method is activated, it is dark blue and has one assessment item called Participation in teaching or Validation. Under teaching you see the time for the implementation. Click on Select.
- Close the pop-up window by clicking on the cross in the upper right corner.
Step 5
- Please note that you are still not registered to the implementation and to complete the registration go to the tab Registration on the top of the page.
- Scroll down until you see the heading Registration for the selected course unit. Here you see the implementation for validation.
- Click on Register.
Step 6
- Check that you have the right study right in the drop-down menu.
- Scroll down and click on Confirm.
- Now you see the implementation under the heading Registrations processed.
Cancel or withdraw from course
Cancel registration
You can cancel a course registration if the registration period is ongoing and the teaching has not started yet.
Follow these steps:
- Go to Registration in the grey bar at the top of the page.
- Click on Cancel under the headline Registrations processed.
Withdraw from course
When the registration period has ended, it is no longer possible to cancel the registration. The only way to leave the course at this point is to withdraw from the course.
Follow these steps:
- Go to Registration in the grey bar at the top of the page.
- Click on Cancel under the headline Registrations processed.
Place unscheduled course units on your timeline
If you have studied before and have a lot of previous studies accredited, you will need a manually created timeline to get an overview of your remaining studies at Arcada. Before you create the timeline, you need to be in contact with your study counsellor.
If you do not have a study plan in Sisu and have accredited studies, contact your study counsellor.
Step 1
- Click on Timeline in the upper left corner.
- Click on the blue tab Add unscheduled courses to the timeline.
Step 2
Here you see all the course units you are to complete. You will need to place them on the timeline one by one with your study counsellor. Please note that you must place them in those periods when there is teaching for each course unit.
- Click on the arrow next to the name of the course unit.
Step 3
- Click on the period when there is teaching for the course unit.
- Repeat for all course units that you find in the tab Place unscheduled courses to the timeline.
Step 4
- Click on the period when there is teaching for the course unit.
- Repeat for all course units that you find in the tab Place unscheduled courses to the timeline.
Step 5
- If you need to remove, change duration or move course; click on the three dots that appear when the cursor is on the course unit.
- Please note that some course units have teaching during several periods. Click on Change duration and then click on all periods when teaching is arranged for the course unit.
- Note that some course units have moved but still has teaching in several periods. In this case, click first on Move course and then Change duration.
Campus Online
Instructions for Registering for Campus Online Courses.
Possible problems when registering to teaching
Registration period ended
When the registration period has ended it is no longer possible to register. In this case you are to contact the examiner.
Registration was rejected
All implementations have registration requirements that need to be met for confirmed registration. The requirements are the following:
- You must have a valid study right / valid completion right for a course.
- You have registered for the academic year as attending.
- The correct version of the course is included in your primary study plan in Sisu.
- You need to have the compulsory prerequisites for the course.
If you notice that your registration was rejected, contact sisu
Create your timeline and register for teaching - accessible version
These instructions are valid from December 2025.
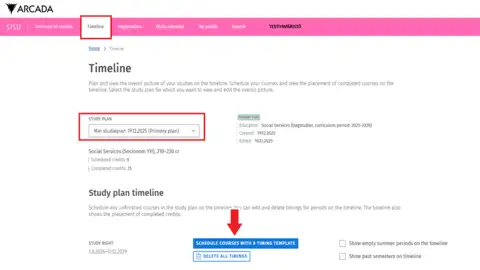
Step 1
- Click on Timeline on the top of the page.
Step 2
- Check that your primary study plan is selected in the dropdown menu.
- Click on Schedule courses with timing template.
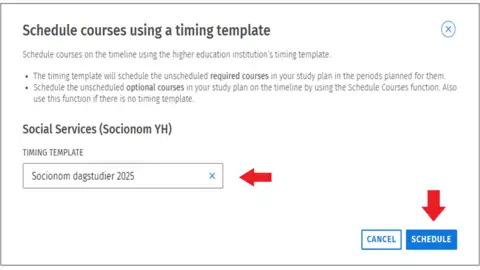
Step 3
- Select the right timing template. It should have the same year as you started your studies.
-
Click on Schedule.
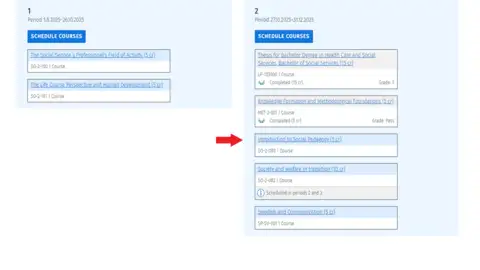
Step 4
-
To register for teaching, click on the little blue code.
Step 5
-
Select the implementation that is meant for your degree program.
Step 6
- Now you see a small blue banner on the top of the page. Click on it to complete the registration.
- On the left-hand side you will now see the course that you have added to your list. Here you need to click on the blue tab tiled Register.
- In the registration pop-up window make sure in the drop-down menu here that you have selected the correct study right. (If you have additional study rights, you will see them all listed here, but most students only have one.)
- Finalize by clicking on the blue button titled Confirm.
-
After you have followed these steps for each of your courses, you are signed up.